Wow. I haven't posted since July. I can not believe it. I have been so busy with the two jobs and all the changes in the garden, yard, kitchen etc. I have thought often of posting a recipe I tried or created without pictures but then decided against it. I have also thought of writing nonsense about my culinary capers without recipes just to keep the blog going but it was not my original intention to do so, so I didn't. Now looking back, I wish I had. Had I done so I would not have months of emptiness on my blog. So I think it is time to just write. I used to enjoy writing back before life got in the way. So I think writing about my garden and culinary experiences will still stay in the spirit of the blog and if not, oh well, its my blog, I can change it if I want to right? Don't worry, I promise to continue with wonderful recipes, just forgive me if I am not as dilligent with the picture updates as I used to be. With time being of the essence and having so little of it, keeping the camera handy to snap food pictures is not really a priority at the moment. As always, good food, and new recipes is.
As we enter into the holiday season (and I do have a vacation coming up in which I hope to work on winter garden projects and try some new recipes..and ofcourse have time to post the results) look forward to renewed energy in the blog and I hope in yourselves.
~K
Saturday, November 29, 2008
Saturday, July 19, 2008
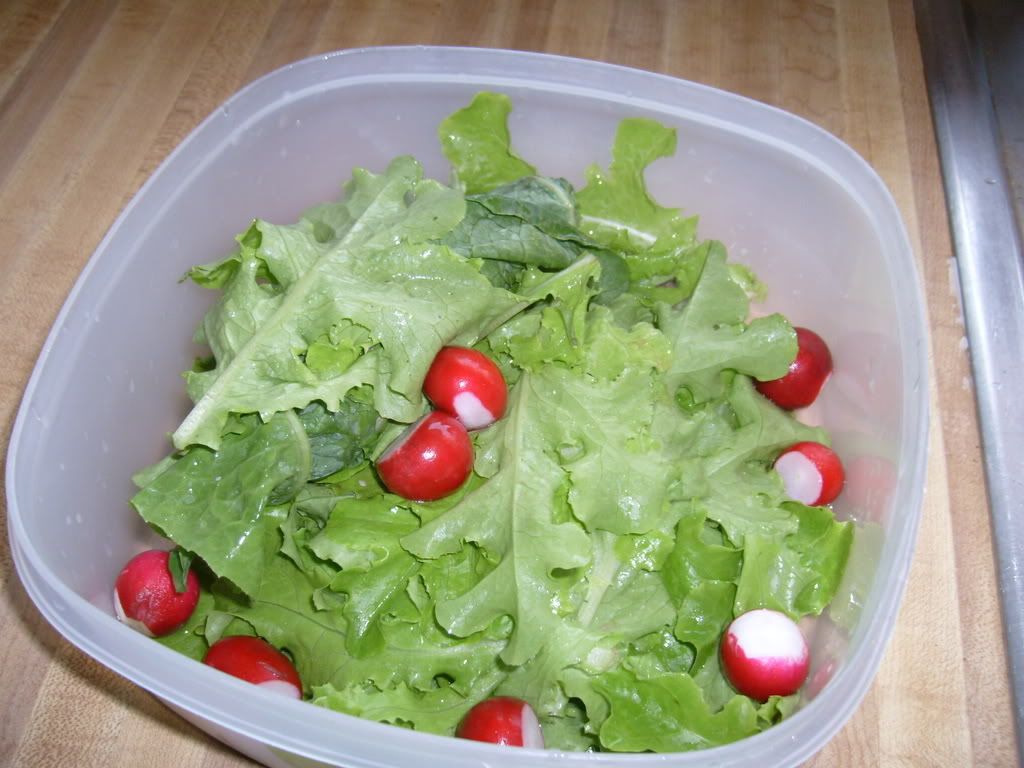
First Pickings
Our first pickings were lettuce and raddishes. I was so excited! I did take pictures...of the first things coming out of the garden...the past month I have been very slack about it...which is sad..because my counters have literally been over run with vegetables and I forget to take their pictures. So please enjoy my garden salad pictures since I'm stingy on sharing the rest of it..LOL

Growing, growing GONE!
It seems like our garden grew overnight....we waited patiently and then BAM...everything started getting huge!! (must have been when the rain finally came in...ya think?)
 cabbage
 squash and zuchini
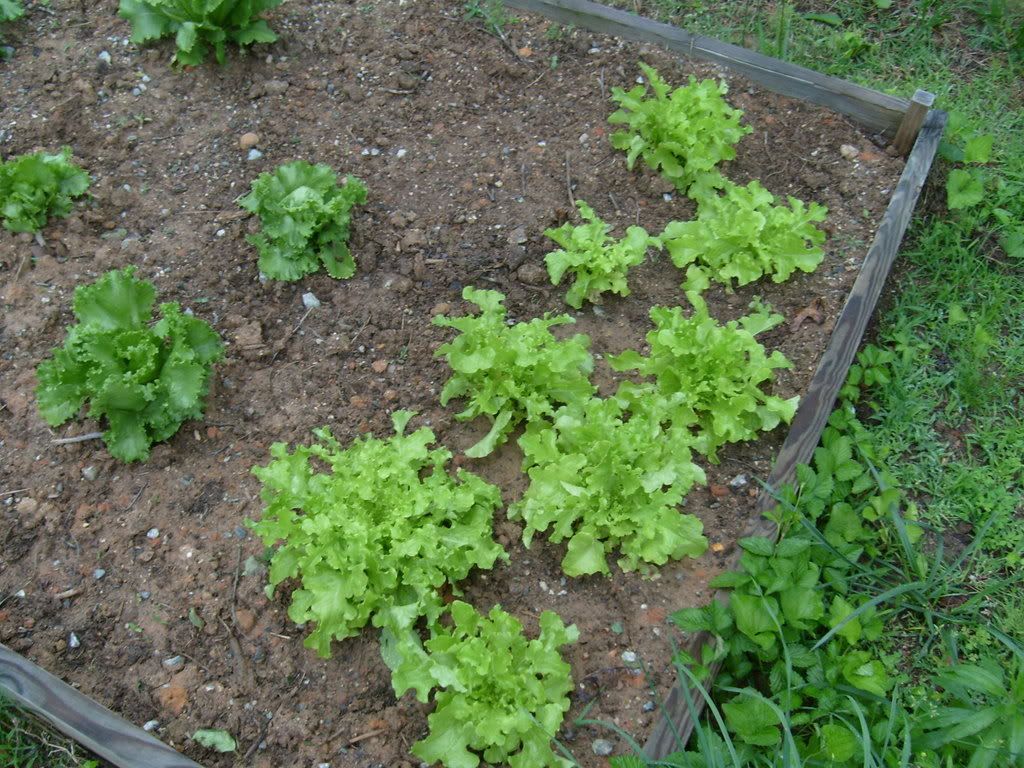
Lettuce (below)

 Houston, we have sighted a tomato!
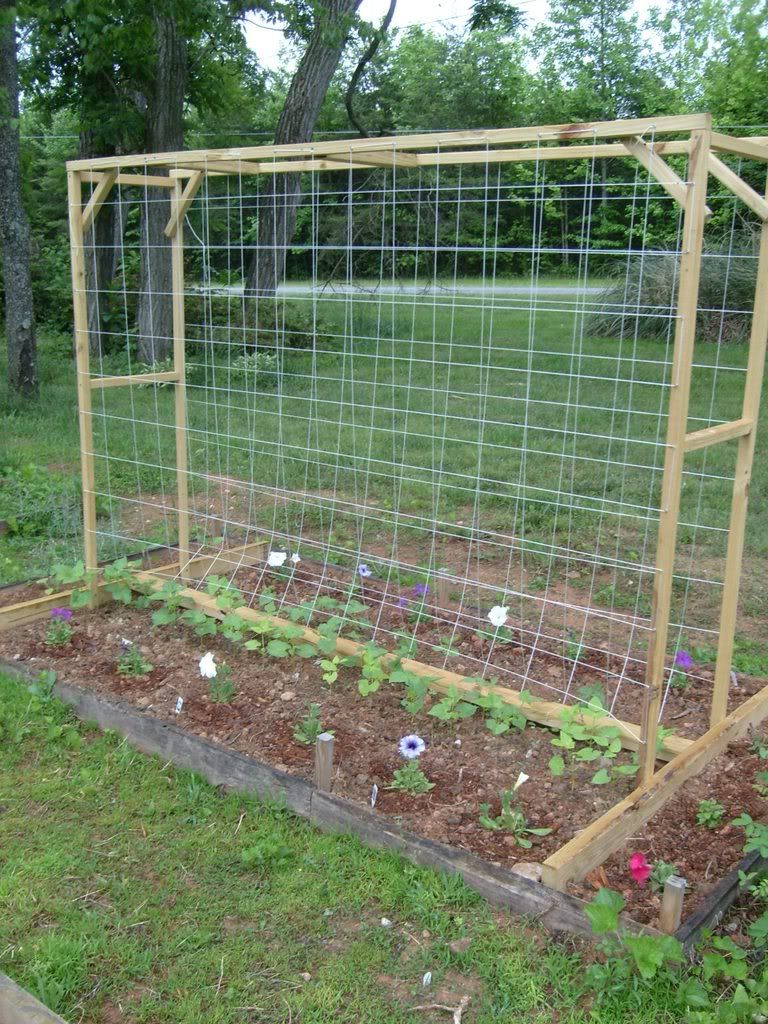
Green beans running!
Mary Mary, How does your garden grow?
These pictures were taken mid-late May...the plants had taken root and begun to grow. We had added zuchini, squash, tomatoes, eggplans, corn, cucumbers, peppers and mulched around the plants in part of the beds.
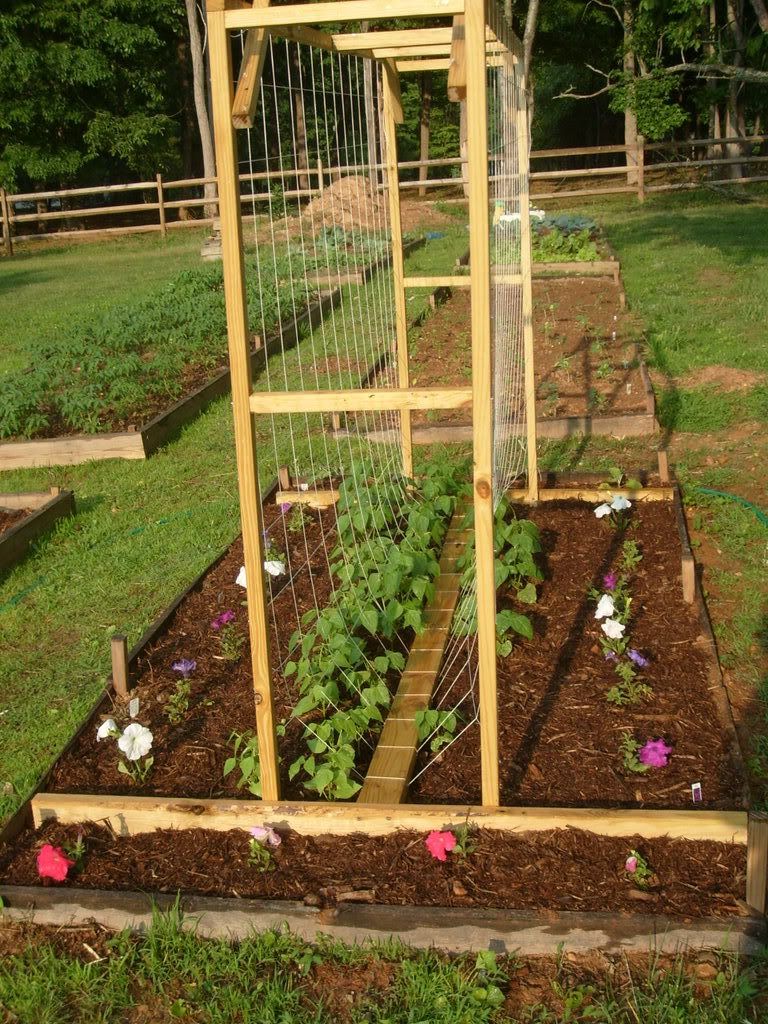
 As a side note: I had read somewhere that petunia's give greenbeans a stronger flavor so I always plant them together....a side benefit is it makes that garden pretty!
Garden Beginnings
I have taken several pics of my garden through the planting and harvesting process. I am going to try and post them in order. This first post is a few weeks after planting. The first things in the ground were radish, cabbage, lettuce and greenbeans.
Stuffed Zucchini Parmesan
This recipe is fantastic and excellent warmed up the next day for lunch. I found this on Cooks.com and followed someone else's adaptation plus adapted it myself to creat a completely new recipe. This is how I MADE it.
Stuffed Zucchini Parmesan
Ingredients:
2 LARGE zucchini (I'm talking baseball bat size here...or 4-5 small zuchini for a gathering of people or side dish).
1/2 cup of Pepperidge Farms Seasoned Stuffing mix
1 lb hamburger, browned and chopped
1 tbs melted butter
1/4 stick butter
1 tablespoon flour
1/4 cup sour cream
salt and pepper, to taste
zucchini pulp
Ragu Pizza Quick Sauce
1 cup Mozzerella Cheese
Parmesan cheese
Directions:
Drop whole zucchini into boiling salted (about 2 tsps salt per 5-6 quart pot) water. Reduce heat and simmer for 15 minutes or until tender.
Drain; cover zucchini with cold water to stop the cooking. When cool, slice in half lengthwise; scoop out meat from centers ( I used an icecream scooper) leaving a hollow shell. Reserve zucchini pulp and set aside.
Mash zucchini pulp using a potato masher or a fork.
Stuffing:
In a small saucepan, melt 1/4 stick butter. Blend in the flour until no lumps remain; add sour cream. Combine with salt, hamburger and zucchini pulp, mixing ingredients until well blended.
Fill the zucchini shells evenly with the stuffing.
Melt 1 tablespoon butter in microwave. Stir in 1/2 cup Pepperidge farms stuffing crumbs, mixing until all are coated. Sprinkle a layer of buttered crumbs on top. Drizzle Ragu Pizza Quich Sauce over the top and Bake in a preheated 350F oven for 20 minutes. Sprinkle top with Parmesan cheese and shredded mozzarella and bake for 10 minutes more.
Zuchini Casserole
For some reason our zuchini plants have done fabulous this year while our squash plants (which are planted with them) have done horribly. Most of my recipes use both but since we only had a bunch of zuchini, I had to find some new recipes. We did some simple grilling which everyone seems to like but I am just not that crazy about grilled zuchini. Here is a recipe I found for a zuchini casserole off of Cooks.com. Stephen says it tastes a lot like the Calico Squash casserole recipe. It does but it has a great texture to it. I'm going to post the recipe in its original form and then post what I did so you can choose how you would like to make it. I'm going to make this again soon and hopefully I will snap a picture of it this time. It completely slipped my mind the other night.
Zuchini Casserole
Ingredients:
4 cups zucchini, peelede, seeded and cut into 1 inch cubes (I leave my peels on and didn't de-seed it: mine is from my garden and the peels have not been waxed and deseeding takes to long!)
1 stick of butter or margarine
1 small to medium onion, chopped
1 cup shredded carrots (I chopped mine)
1 can cream of chicken soup
1 cup of sour cream ( I think I used a bit more)
1 box of Pepperidge Farms seasoned croutons (I couldn't find these so I used a half of bag of Pepperidge Farm seasoned stuffing mix)
Directions:
Boil zucchini just until tender and drain. In a large skillet, melt butter. Add carrots and onion and saute until tender. (3-4 minutes over medium-high heat)
Remove from heat and stir in sour cream, soup (undiluted), zucchini and half the croutons (or 3/4 of the stuffing). Pour into 3 quart baking dish. Top evenly with remaining croutons (or stuffing mix). Cover with foil (I didn't do this) and bake at 350 degrees for 35-40 minutes. (I baked at 400 for 15-20 minutes.) I also used a bit more zucchini then called for (not sure how much as I didn't measure ;).
Zucchini Casserole
To Die for Blueberry Muffins

We went to the farmer's market a few weeks ago and bought some blueberries. I have no idea what possessed me because I rarely buy or eat blueberries. So we bring them home and I'm like...what do we do with them now? I decided from scratch blueberry muffins would be the answer. I found a recipe that had some Fantastic Reviews and had been tried by over 2000 people. It looked easy so I tried it. I could not get pictures of the darn things because they disappeared so fast!!! I'm using the picture from allrecipes (I hope I can do that) and including the link to the original recipe as I used it exactly. I highly recommend this recipe...its simple, its sweet, and it is comforting. One of these days I'll be able to have some for breakfast...if they will ever last longer then 10 minutes once I make them!!
To Die For Blueberry Muffins:
Ingredients:
1 1/2 cups all-purpose flour
3/4 cup white sugar
1/2 teaspoon salt
2 teaspoons baking powder
1/3 cup vegetable oil
1 egg
1/3 cup milk
1 cup fresh blueberries
1/2 cup white sugar
1/3 cup all-purpose flour
1/4 cup butter, cubed
1 1/2 teaspoons ground cinnamon
3/4 cup white sugar
1/2 teaspoon salt
2 teaspoons baking powder
1/3 cup vegetable oil
1 egg
1/3 cup milk
1 cup fresh blueberries
1/2 cup white sugar
1/3 cup all-purpose flour
1/4 cup butter, cubed
1 1/2 teaspoons ground cinnamon
Directions:
Preheat oven to 400 degrees F (200 degrees C). Grease muffin cups or line with muffin liners.
Combine 1 1/2 cups flour, 3/4 cup sugar, salt and baking powder. Place vegetable oil into a 1 cup measuring cup; add the egg and enough milk to fill the cup. Mix this with flour mixture. Fold in blueberries. Fill muffin cups right to the top, and sprinkle with crumb topping mixture.
To Make Crumb Topping: Mix together 1/2 cup sugar, 1/3 cup flour, 1/4 cup butter, and 1 1/2 teaspoons cinnamon. Mix with fork, and sprinkle over muffins before baking.
Bake for 20 to 25 minutes in the preheated oven, or until done.
Strawberry Cream Puffs with Strawberry Sauce
I found this recipe on Epicurious and thought it would be great to try with the fresh strawberries my parents brought me. I read the reviews and most people raved about cream puffs, how easy they were etc. Mine were more like pancakes....they just...spread out and didn't puff...so my "puffs" are more like strawberry stuff cookies with sauce....which still tasted good...they were light and airy with a rich sweetness that glided over the tongue....but they definately weren't puffs. I'm not sure what I did wrong....but I was cooking fifty million things that day so it may just be something I DID or DIDn't do versus the recipe. If you try it, please do share your results!!
 Ingredients:
Cream Puffs:
3/4 cups water
3 tbs unsalted butter, cut into pieces
1/4 tsp salt
1/4 tsp sugar
3/4 cup all purpose flour
3 large eggs
Filling:
1 cup chilled whipping cream
1 tsp plus 3 tbs sugar
1/4 tsp clear cherry brandy (I used rum)
1/8 tsp vanilla extract (I used a bit more)
6 large strawberries, hulled
Strawberry Sauce:
2 1-pint strawberries, hulled
3 tbs sugar
Topping:
Powdered Sugar
Shaved white chocolate (I added this...it's not really needed but oh so good).
Directions:
Preheat oven to 375 degrees. Line baking sheet with parchment paper. Combine water, butter, salt and sugar in heavy medium saucepan. Bring to boil, stirring to melt butter. Add flour; using wooden spoon, stir vigorously until mixture clumps together, forming ball. Stir 1 minute longer. Remove from heat. Transfer dough to medium bowl. Using electric mixer, add eggs 1 at time, beating until dough is smooth after each addition (dough will be slightly soft and shiny).
Using 1 rounded tablespoon dough for each cream puff, spoon dough onto prepared baking sheet, spacing about 2 inches apart and forming mounds about 3/4 inch to 1 inch high and 1 1/4 inches in diameter. Using moist fingertips, gently press tops of cream puffs flatten any peaks. Bake until golden brown, about 37 minutes. Transfer baking sheet to rack; let cream puffs cool. (Can be made 4 hours ahead. Let stand at room temperature.)
For filling:Beat cream, 1 teaspoon sugar, kirsch and vanilla in medium bowl until stiff peaks form. Combine 6 strawberries and 2 tablespoons sugar in small bowl. Using fork, crush berries. Fold crush strawberry mixture into cream.
Cut top third off each cream puff. Place cream puff bottoms, cut side up, on plates. Spoon filling into bottoms, mounding slightly. Ladle sauce over, allowing sauce to spill onto plates. Top with cream puff tops. Dust with powdered sugar.
For sauce:Puree 1 basket strawberries in processor. Transfer to bowl. Stir in sugar. Quarter remaining strawberries; add to sauce.
Makes about 2 1/3 cups.
Pineapple-Chicken Salad
This recipe is fantastic. It is a BEAUTIFUL presentation and impressive to everyone. It also fills you up and is just a satisfying dish all around. Another recipe from the old WW cookbook except I don't believe I changed it much if any.

Pineapple-Chicken Salad
Ingredients:
1 Small Pineapple
6 ounces diced cooked chicken ( I used one large chicken breast I believe)
1/2 cup of cubed or julienned Cheddar Cheese.
1/4 cup each: sliced celery, sliced carrot (or coined), green bell pepper, scallions, and golden raisins.
3 cups torn lettuce leaves (a mixed lettuce works best)
1/2 cup plain low-fat yogurt (I used vanilla for a slightly sweeter flavor)
2 tbs plus 2 tsps mayonnaise
1/4 tsp salt
Dash pepper.
Directions:
Cut pineapple in half lengthwise leaving stem and leaves in tack. Using a mellon ball scooper or icecream scoop, hollow fruit out of each half leaving a 1/4" thick shell. Dice pineapple and use One cup of it for the salads. (I used a bit more as I love pineapple...the rest was fought over by my father and husband like rabbid dogs..it was hillarious!!)
In medium bowl combine pineapple, chicken, cheese, vegetables and raisens. Line the pineapple shells with the lettuce (approx. 1 1/2 cups each) and distribute evenly the chicken mixture between the two.
In a small bowl combine remaining ingredients and drizzle evenly over pineapples. I chilled them for 30 minutes before serving. Each shell is 2 servings but my husband and I agreed that it would make a great lunch out doors by the pool in which case we could probably eat one half each...but four our dinner party with my parents we ate half of one each and it was a great amount served with other dishes.
Stuffed Pasta Shells
This recipe was adapted from a recipe on Cooks.com with a little help from a recipe in an Old Weight Watchers Cookbook. It is a very pretty dish that looks like you worked your butt off, so it is great for entertaining. It is also very light and rich all at the same time so you don't want too much of it. Another great for entertaining. Serving size is 4 shells each but honestly 2 would be plenty if you have several dishes available.

Stuffed Pasta Shells
Ingredients:
16 jumbo macaroni shells cooked according to package
1 cup Ricotta Cheese
1 1/3 cup cottage cheese
1 cup mozzerella
1 egg
4tbs parmesan, grated
1 tsp salt
1/4 tsp pepper
1 tsp parsley
2 tsp lemon juice
Chopped mushrooms (optional)
1 can of tomato sauce (preferably the ones seasoned with italian spices) or you can use spaghetti sauce with or with/out meat....I wanted a lighter flavored meal so I used just the seasoned tomato sauce.
1 can of tomato sauce (preferably the ones seasoned with italian spices) or you can use spaghetti sauce with or with/out meat....I wanted a lighter flavored meal so I used just the seasoned tomato sauce.
Directions:
In small bowl combine all cheeses with the egg (already beaten) and mix in seasongings. Gently stuff shells and pour tomato sauce over the top using a large casserole dish. Bake in oven at 350 degrees for 20-25 minutes....serve warm.
Generation Slacker
.....that would be me!! So many things have happened in the past two months that I can not even believe I have not updated my blog. The summer is the busiest time of year, there is no getting around it. While everyone looks forward to fresh produce, days in the sun, family vacations...Steve and I partly dread it: hot days, troublesome flies and bugs, cleaning the pool, yard mowing, etc. This summer, I have been working two jobs on top of everything else so I've been tired and not had nearly as much time to garden and cook. My yard and flowerbeds look terrible. I admit it freely. Our beautiful garden that we were taking so much loving care...yea...well....the weeds are terrible, and we have had some issues. We had such a heat spell at the end of may when all the plants were babies...and it was so dry.....and then a month later we got a deluge of rain...just constant and cooler temperatures that it really did a number on everyone's plants around here. More on that later.
Have no fear though, just because I wasn't posting like a good girl, I was taking pictures of garden and recipes and trying out some new dishes. okay okay, so I few of them I forgot to snap pictures, but I didn't have pictures to go by when I created the recipe so I'm sure you will be fine ..LOL
I hope everyone is enjoying their summer and finding wonderfully cheap easy recipes using local fresh produce! A summer picture for you: Tedda and Snickers in the yard.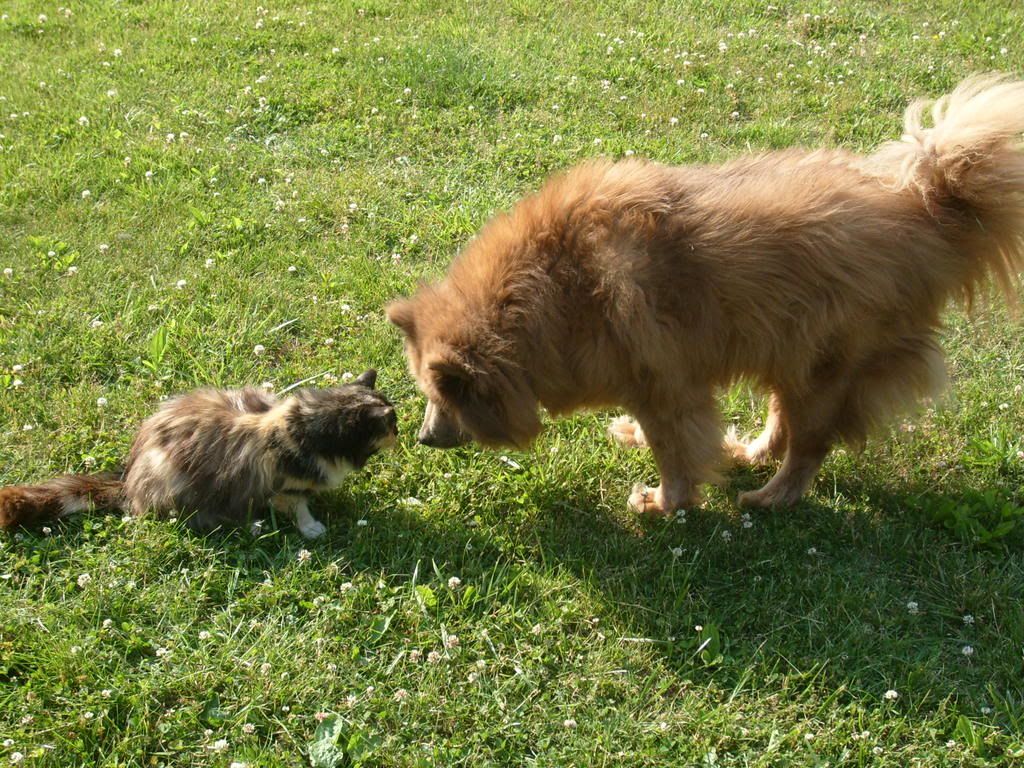
Monday, May 5, 2008
"BETTER THAN SEX" Cheesecake

For Sarah's Birthday I came up with a new Cheesecake recipe to make sure it was gluten-Free. The cheesecake filling is easy to transfer to a gluten free cake, its the crust that is the kicker. So I came up with an idea. Flourless Peanut Butter Cookies!! Two days ahead, I made the cookies, and then 24 hours ahead of the party I crumbled them for the crust. Lined them in the base of a spring form pan and TA-DA: gluten free crust!! However...I didn't want this yummy cheesecake to not blend with this peanut butter crust: So I did a chocolate Swirl cheesecake (what's better then chocolate and Peanut Butter right?) and topped it with chopped Reese's Peanut butter cups  with a homemade chocolate caramel Sauce. FANTASTIC!! Very rich so the cake will go really far because you can only eat so much at a time..really...you want to make the pieces VERY VERY SMALL!! Here's How I did it and I hope you enjoy it!!
SARAH'S Special Cheesecake (or as she calls it BETTER THAN SEX CHEESECAKE)
Crust: See Flourless Peanut Butter Cookie Recipe
Filling:
2 1/2 lbs softened cream cheese (5 blocks-leave at room temp for thirty minutes to soften)
1 3/4 cups white sugar
3 tbs all-purpose flour (I used a special gluten free blend that sarah makes but any gluten free flour should work such as Red Mill or Almond flour would be really good).
5 eggs
2 egg yolks
1/4 cup heavy whipping cream (or sour cream but I used the whipping cream since I needed that for the sauce as well).
1 tsp grated lemon peel
1 tsp grated Orange peel
1/4 tsp vanilla
Chocolate filling:
14 ounces semi-sweet chocolate chips
1/2 cup white sugar
Topping:
5-6 Large Reese's Peanut Butter cups (use this brand for gluten-free) CHOPPED
TIP: Freeze PB cups for thirty minutes before cutting so they are very firm. Use a very sharp knife and to gently chop them up..if you use an electric chopper or hand chopper it will destroy the cups and you want the pieces to have shape.
See below for SAUCE recipe and directions.
Directions: Preheat oven to 475 degrees F (245 degrees C). In a large bowl, combine cream cheese and sugar. Use the paddle attachment for the KAMixer at this point to beat the sugar and cream cheese. Add flour, eggs (I prefer to do the eggs one at a time),vanilla and citrus peels. Switch your KA to the whisk attachment and whisk briskly to remove all clumps and get a nice fluffy consistency. Add your heavy cream and just mix until its blended in. DO NOT OVER MIX with the cream in there. If you do not have a KAMixer, you a hand mixer and look for a nice thick no clump consistency but it will not have a whipped look..will still work perfectly though. Pour half of this mixture into pan, gently spreading over PB crust. In the microwave, heat choco chips and sugar together in glass container
 (DO NOT USE PLASTIC) for 2 minutes. (chips will still appear to be in original form you don't want to overmelt them). Pour Chocolate chips (they will turn to thick melt chocolate as you scrape them out) into left over batter and mix until blended. You are looking for a nice chocolate mousse appearance (or with hand mixer a thick chocolate pudding type appearance). Gently pour chocolate mixture in spring form pan. You can take a knife or fork to gently swirl the two layers together or score the two layers or leave them stacked. Appearance is up to you!
Place cake in oven on top rack with a casserole dish full of water on bottom rack. Bake for 10 minutes. Reduce temperature to 200 degrees F (95 degrees C) and continue to bake for 1 hour. Turn oven off and Leave cake in there for FOUR HOURS to cool and set. Place cake in Refridgerator for atleast 8 hours to finish setting. The water bath and long cool times (to reduce quick changes in temperature) will keep your cake from cracking! An hour or two before you need to serve the cake, top with the PB cups and Sauce. Chill another one to two hours before serving!!

Chocolate Caramel Sauce
Ingredients:
4 tbs sugar
6 tbs heavy cream
2 oz fine-quality bittersweet chocolate (not unsweetened), coarsely chopped or in small chuncks
1/8 tsp vanilla
Directions: Cook sugar in a very small dry heavy sauce pan or skillet over moderately high heat, undisturbed, untl sugar begins to melt. (about 1-2 minutes). Continue to cook, stirring occasionally with a fork, until sugar is melted into a medium/deep golden caramel (abotu 2 minutes). Remove Caramel from heat and carefully pour in cream (mixture will steam and bubble vigorously). Once bubbles begin to subside, add chocolate and stir until sauce is smooth. Stir in vanilla and let cool for just a minute or two so it won't melt your cake and PBcups too much!
This sauce is not the easiest thing in the world. I'm a pretty good cook/baker and I had some problems with this sauce. It took me a few tries to get it right and even then I ended up with this hard clot around the fork. If you mess up, you will know when you add the cream so you won't waste the chocolate..just grab another pan and try again. Soaking in warm water cleans the pans and forks easily so don't worry about it. TIP: WATCH it like a HAWK. Making this sauce was the fastest four minutes of my life!!
Notes: The cheesecake filling is for a NY style cheesecake so you can leave the citrus out of it if you are adding chocolate if you choose. I like it in there for that extra zest! Also, because this is for a NY style cheesecake 10-12 inch, you will have leftover batter if you add the chocolate. So I made a 10 inch cheesecake and a five inch cheesecake and just baked them together!
 with a homemade chocolate caramel Sauce. FANTASTIC!! Very rich so the cake will go really far because you can only eat so much at a time..really...you want to make the pieces VERY VERY SMALL!! Here's How I did it and I hope you enjoy it!!
SARAH'S Special Cheesecake (or as she calls it BETTER THAN SEX CHEESECAKE)
Crust: See Flourless Peanut Butter Cookie Recipe
Filling:
2 1/2 lbs softened cream cheese (5 blocks-leave at room temp for thirty minutes to soften)
1 3/4 cups white sugar
3 tbs all-purpose flour (I used a special gluten free blend that sarah makes but any gluten free flour should work such as Red Mill or Almond flour would be really good).
5 eggs
2 egg yolks
1/4 cup heavy whipping cream (or sour cream but I used the whipping cream since I needed that for the sauce as well).
1 tsp grated lemon peel
1 tsp grated Orange peel
1/4 tsp vanilla
Chocolate filling:
14 ounces semi-sweet chocolate chips
1/2 cup white sugar
Topping:
5-6 Large Reese's Peanut Butter cups (use this brand for gluten-free) CHOPPED
TIP: Freeze PB cups for thirty minutes before cutting so they are very firm. Use a very sharp knife and to gently chop them up..if you use an electric chopper or hand chopper it will destroy the cups and you want the pieces to have shape.
See below for SAUCE recipe and directions.
Directions: Preheat oven to 475 degrees F (245 degrees C). In a large bowl, combine cream
 cheese and sugar. Use the paddle attachment for the KAMixer at this point to beat the sugar and cream cheese. Add flour, eggs (I prefer to do the eggs one at a time),vanilla and citrus peels. Switch your KA to the whisk attachment and whisk briskly to remove all clumps and get a nice fluffy consistency. Add your heavy cream and just mix until its blended in. DO NOT OVER MIX with the cream in there. If you do not have a KAMixer, you a hand mixer and look for a nice thick no clump consistency but it will not have a whipped look..will still work perfectly though. Pour half of this mixture into pan, gently spreading over PB crust. In the microwave, heat choco chips and sugar together in glass container
 (DO NOT USE PLASTIC) for 2 minutes. (chips will still appear to be in original form you don't want to overmelt them). Pour Chocolate chips (they will turn to thick melt chocolate as you scrape them out) into left over batter and mix until blended. You are looking for a nice chocolate mousse appearance (or with hand mixer a thick chocolate pudding type appearance). Gently pour chocolate mixture in spring form pan. You can take a knife or fork to gently swirl the two layers together or score the two layers or leave them stacked. Appearance is up to you!
Place cake in oven on top rack with a casserole dish full of water on bottom rack. Bake for 10 minutes. Reduce temperature to 200 degrees F (95 degrees C) and continue to bake for 1 hour.
 Turn oven off and Leave cake in there for FOUR HOURS to cool and set. Place cake in Refridgerator for atleast 8 hours to finish setting. The water bath and long cool times (to reduce quick changes in temperature) will keep your cake from cracking! An hour or two before you need to serve the cake, top with the PB cups and Sauce. Chill another one to two hours before serving!!
Chocolate Caramel Sauce
Ingredients:
4 tbs sugar
6 tbs heavy cream
2 oz fine-quality bittersweet chocolate (not unsweetened), coarsely chopped or in small chuncks
1/8 tsp vanilla
Directions: Cook sugar in a very small dry heavy sauce pan or skillet over moderately high heat, undisturbed, untl sugar begins to melt. (about 1-2 minutes). Continue to cook, stirring occasionally with a fork, until sugar is melted into a medium/deep golden caramel (abotu 2 minutes). Remove Caramel from heat and carefully pour in cream (mixture will steam and bubble vigorously). Once bubbles begin to subside, add chocolate and stir until sauce is smooth. Stir in vanilla and let cool for just a minute or two so it won't melt your cake and PBcups too much!
This sauce is not the easiest thing in the world. I'm a pretty good cook/baker and I had some problems with this sauce. It took me a few tries to get it right and even then I ended up with this hard clot around the fork. If you mess up, you will know when you add the cream so you won't waste the chocolate..just grab another pan and try again. Soaking in warm water cleans the pans and forks easily so don't worry about it. TIP: WATCH it like a HAWK. Making this sauce was the fastest four minutes of my life!!
Notes: The cheesecake filling is for a NY style cheesecake so you can leave the citrus out of it if you are adding chocolate if you choose. I like it in there for that extra zest! Also, because this is for a NY style cheesecake 10-12 inch, you will have leftover batter if you add the chocolate. So I made a 10 inch cheesecake and a five inch cheesecake and just baked them together!
Sunday, May 4, 2008
Flourless Peanut Butter Cookies
 Ingredients:
1 Cup Chunky Peanut Butter
3/4 cup Brown Sugar
1 Large egg
1/2 tsp vanilla
1/2 tsp baking soda
1/4 tsp salt
Directions: Mix together ingredients until a nice sticky dough has formed. Chill for 30 minutes in refridgerator (covered in plastic). Use a rounded tablespoon to scoop out 1 inch balls and place on ungreased pan ( I use a pizza stone). Press gently with the palm of your hands. You can also do the hatch marks with a fork (press tines flat on top of cookie) but with Flourless PB cookies they don't really show up. Bake at 400 for 10 minutes.
Yard Bouquet
 I know my blog is about cooking and gardening and how to make great recipes using what you grow. However, there are also other things you can do with homegrown things and while I will rarely post them, I thought a few quick mentions occasionally would not be a bad idea. Something quick and easy is to make easy floral decorations for showers, parties, birthday's etc. Many people will take some nice long stemmed flowers and put them in a vase but I like to do low floral bowls.
 Directions: Take a nice simple crystal bowl and hot glue a square of florists foam in the base.  This can be reused multiple times before you have to remove the foam and put a new piece in. Soak the foam in water. Choose flowers from your yard in various heights preferably with woody/stiff stems. For this arrangement I used Salmon Azaleas, burgandy old fashioned roses, yellow snap dragons and purple iris.
 This can be reused multiple times before you have to remove the foam and put a new piece in. Soak the foam in water. Choose flowers from your yard in various heights preferably with woody/stiff stems. For this arrangement I used Salmon Azaleas, burgandy old fashioned roses, yellow snap dragons and purple iris.
Arrange the flowers around the foam. I like to do the tall center and then the low sides filling in the spaces from there. Don't worry about having everything even and precise. Let the flowers natural shapes and colors blend on their own! Easy, Quick, Fun!
Dillicious Potato Salad

For one my BFF's thirtieth birthday, I had to make sure the menu was not only easy, fun and fabulous but also GLUTEN FREE. To go with the beautiful weather I chose to make my Cheeseburgers on the grill. I pulled out a great Potato Salad recipe that only needed minor adjustments to be naturally gluten free. This recipe is from "Secrets of Fat-Free Cooking" by Sandra Woodruff, RD 1995. HAPPY BIRTHDAY SARAH!!
DILLICIOUS POTATO SALAD
Ingredients:
2 pounds unpeeled potatoes (about 6 medium/small) I like to use Red potatoes.
1 cup frozen green peas, thawed I always use one can of Early Peas
1/3 cup finely chopped carrot (my carrots were looking a bit yucky so I left this out this time...it definately needs this)
1/3 cup chopped onion
Dressing:
1/4 cup plus 2 tbs nonfat sour cream
1/4 cup plus 2 tbs nonfat or light mayonnaise (Use Regular Mayonnaise for Gluten Free as many Light/fat free mayo's have added gluten).
1 tbs lemon juice
1 tbs Dijon mustard (use French's Yellow mustard for Gluten Free recipes)
1/4 tsp ground white pepper (black works fine)
1 tbs finely chopped fresh dill or 1 tsp dried
This is a very simple easy recipe that is healthy and tasty. I have been making it for years and it is easy to adjust by adding in boiled eggs, more onions, etc. This is the basic recipe and is tried and true just as it is.
Thursday, May 1, 2008
Chocolate Chip Cookies
What is more perfect then a chocolate chip cookie? Not much. It's simple, it's sweet, crunchy, chewy, warm or cold, and above all comforting. Sweet memories of childhood, indulgent and above all: SIMPLE. Simply perfect chocolate chip cookies. I really felt like baking today but at the same time I didn't want to go all out since I have to make a Cheesecake tomorrow. Answer? Chocolate chip cookies and I have everything on hand to make them. PERFECT. Now to be honest, I have never made a simple chocolate chip cookie home made before! It's a crime I know, but what can I say? When I make cookies its usually the big batch of Christmas cookies which have tons of stuff in them and are delish and yummy...but I wanted simple. After doing a little research on recipes (I know, that took the simplicity out of it) I found that most recipes were adapted from the original TOLLHOUSE recipe so I decided to take that basic recipe and tweak it just a tad bit. Did I make the ultimate chocolate chip cookie?? Maybe, maybe not. I don't think it is the ULTIMATE chocolate chip cookie, but it is pretty darn good, if I do say so myself!!

Simply Perfect Chocolate Chip Cookies
2 cups SELF-RISING flour
1/2 cup quick cooking oats (blended to a powder)
2 sticks butter (melted)
3/4 cup light brown sugar (mixed in with butter as it melts)
3/4 cup granulated sugar
1tbs vanilla
2 eggs
14oz Semi-Sweet Chocolate chips
1 cup coconut flakes (blended to make them finer) This is Optional and can also be substituted with one cup of chopped nuts.
Directions:
Beat Butter, vanilla and sugars in large mixer bowl. Add eggs one at a time, beating well after each addition. Gradually add in flour and oatmeal. Scrape down sides and continue to mix. Add in coconut and chocolate chips.
Chill dough. Drop by spoonfuls (rounded tablespoon works great) or little 1 inche balls onto ungreased cookie sheets. Bake in preheated over at 375 degrees for 20 minutes =/- until golden brown. Let stand atleast 2 minutes: remove to wire racks to cool.
Wednesday, April 30, 2008
Garden Trellis
I will have a few new updates this week. YAY!! I did try a new recipe this past weekend but it was absolutely horrible so I'm not posting it here. I have another recipe this coming Friday so stay tuned for more Recipes! I have a quick garden update for now though. We have had rain for Eight weekends straight now so I have had a hard time getting everything accomplished in the garden that I need to do.
Steve did get the trellis he designed for our greenbeans finished and installed though! It is fabulous. I can't wait to see how the greenbeans work on it!! They are planted around it and I am waiting patiently for greenbeans to start climbing. Until then, enjoy my husbands handy work..free of charge ;)

Sunday, April 20, 2008
Weekend Warrior
Weekend Project: Entry beautification. I know, it is not food related but I was very proud of myself. I had to deweed, hand turn soil and pull out roots, dig a trench and build retaining wall on the back side, haul in rocks and dirt and plant seeds. I have evening primrose, nicotiana, asters and scarlet flax planted in the bare spots to blend with the stella dora's and climbing vine. This also allows for blooms in different seasons. I will try to remember to do an update post when the seeds turn into blooms.


Finally, GARDEN updates
While I have not been doing a lot of creative cooking lately, I HAVE been working outdoors, taking advantage of the pretty weather. So I have some spring Garden updates for you!

 Above is the second bed that has the soil topping and is waiting to be tilled.


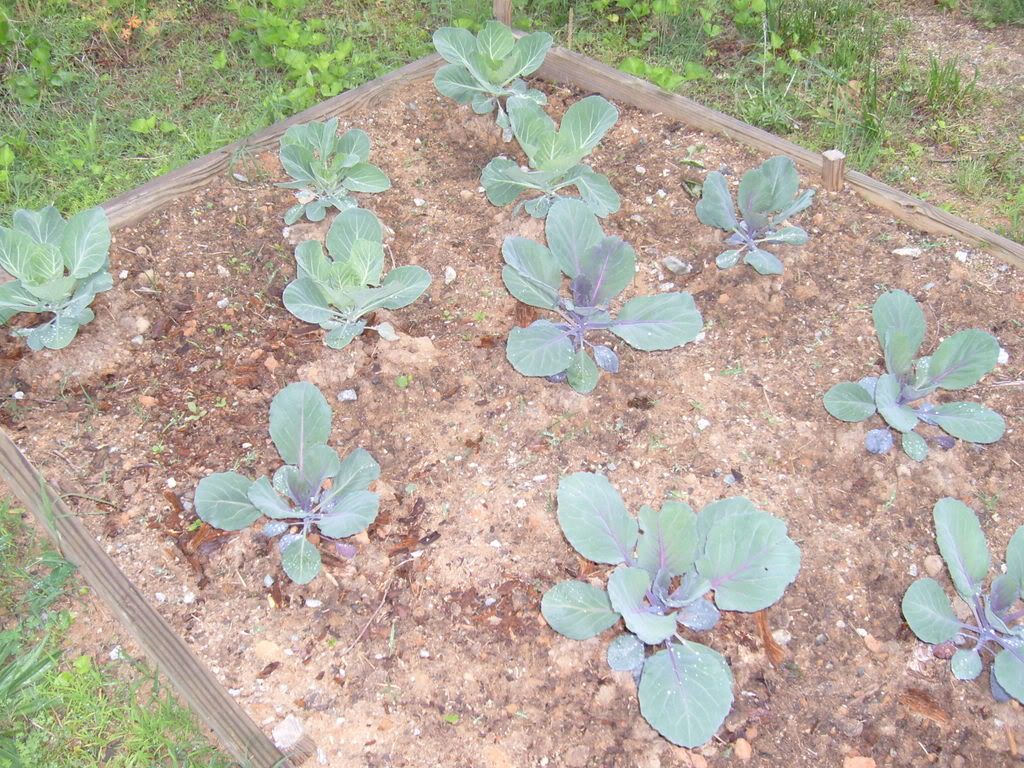
We have raked the garden boxes free of winter debris, Stephen tilled them and four of them have been filled with horse manure (two left to do). Two of them have been topped with fresh soil, and one has been retilled and planted with cabbages and various lettuce species. Stephen has also made progress on the new Bean Fences that will hopefully go into place this week as well. Here are some pictures of the boxes in the various stages as of this weekend!
Above is the finished bed newly planted with cabbage and lettuce.
Above is the second bed that has the soil topping and is waiting to be tilled.

Left: Layer of dried manure. Right: Empty bed that has been raked/tilled and is waiting for manure.
FanKAstic
I finally took a picture of the coveted KA Mixer that my darling husband bought me for my 30th birthday. Fellow bakers, cooks, and recipe bloggers will all back me up that this is the most coveted piece of kitchen equipment! There are no words needed really....so I'll just post the picture...it's definately worth a thousand words. 
Tuesday, April 15, 2008
Cake Creations
In another inventive phase I actually printed off several recipes for inspiration and sat down and combined ingredients, quantities etc. to form my own recipe for a desired taste and then made it. I was extremely impressed. There are a few changes I want to make next time to perfect it but I will add those in here in red. If you make this, please let me know what changes you incorporate and how it turns out!!
Sweet Potato Cream Cheese Pineapple Upside-down Cake?Ingredients:
2 cups self-rising flour (needs more flour, try 3)
1/2 cup brown sugar
1 1/2 cups sugar
3 1/2 tsps cinnamon
2 cups sweet potato (make sure its well drained..I used cooked and frozen from my last years garden)
2 tsps vanilla extract
1/2 cup crushed pineapple
1/4 oil (can cut down on this a tad or substitute applesauce)
1/2 cup pineapple juice
1/2 tsp nutmeg
2 eggs
Filling:
8oz cream cheese (softened)
1 egg
3 tbs sugar
Topping:
Pineapple rings
3/4 stick butter
3/4 brown sugar
1/2 tsp coconut/vanilla extract
Chopped nuts (optional, I didn't use these but thought about adding them next time)
Directions:
Preheat Oven to 375. Mix Sweet potato, eggs, oil, vanilla, pineapple, pineapple juice together. In seperate bowl mix flour, sugars, cinnamon, nutmeg. Make well into flour mixture and pour potato mixture into it. Mix gently. Mix Filling Ingredients together in a seperate bowl and set aside.
In skillet melt butter, add brown sugar-stir over medium LOW heat until melted and mixed. Pour into a bundt pan (I use a stoneware bundt pan but this would probably work in other kinds of cake pans). Arrange pineapple slices into mixture. Pour half of pumpkin batter on top, pour cream cheese mix in, swirl slightly and pour the other half of pumpkin batter in. Bake approx. 1 hr or until tester comes out clean.
This created a VERY moist (almost like it wasn't done but it was) cake with a heavenly flavor and delightful aroma. It was a hit but I want to PERFECT it! I hope you enjoy it! AND PLEASE leave comments on your suggested changes, how it turned out and even name ideas!!
Easy Pot Pie
 This is one of my favorite recipes that I have come up with. I will often get the desire for something and am too lazy to look up a recipe or I just do not like the ones I find. Inventiveness is the key to my cooking (and occasionally my downfall as well.) The key to the Pot Pie Recipe is my Pampered Chef Deep Dish Baker (a Christmas Gift by a good friend....THANKS TONYA!) that I adore!
 Chicken/Turkey Pot Pie
Ingredients:
2 cups cubed chicken or turkey (this is great to use leftovers)
2 Pillsbury Roll Out Pie Crusts

2 cans of gravy (cream soup would work as well)
2 stalks celery (cleaned and finely slivered)
2 medium-large Carrots (cleaned and finely coined)
2-3 small-medium potatoes (cleaned partly skinned, cubed and boiled)
1/4 tsp salt
1/2 tsp pepper
One small onion (finely chopped)
1/4 tsp basil
1/4 tsp rosemary
1/4 tsp thyme
1 egg
1 tbs butter
Directions: Roll one pie crust (room temperature) into baking pan. Preheat oven to Box's directions. Whisk egg in small bowl with a splash of water and a dash of salt-set aside. Melt One tbs butter in pan, add onion and saute for 2-3 minutes on medium heat. Add salt, pepper, basil, rosemary, thyme and continue to saute for another minute or two. Add in celery and carrots and continue to stir for a few minutes more. Add meat and potatoes continuing to stir until heated through. Pour contents into prepared dish. Pour both cans of gravy over top mixture and toss around gently with fork (do not disturb pie crust). Roll second crust over top of the mixture and pinch sides of bottom crust and top crust to close. Cute a cross/X into the top and brush egg wash over top. Bake for about 30 minutes or until crust is golden brown.
Wednesday, April 2, 2008
B is for Barbeque
Living in the South, only 30 minutes from the Famous Barbeque city of Lexington, you would think I would know how to make barbeque. Up until recent years, however, I was not actually a fan of barbeque (the pulled pork variety). Necessity may be the mother of invention, but leftovers are cause for creativity. Stephen does not like having leftovers for some reason. They are fine for lunches but he does not like having the same dinner every night. So far this has not effected our budget much as we eat them for lunch so we do not have to buy lunch type foods (i.e sandwich meat, frozen meals, etc.) although I do try to keep 1 lb of deli meat and a loaf of bread on hand (and some Ramen noodles for him) for those days we do not end up with leftovers. During the recent meal planning stage I noticed that Harris Teeter had pork butt roasts on sale so I had planned a roast into the menu...when I got there, they were fairly large so I knew I would have leftovers. Last night we had a traditional seasoned roast but I decided to try my hand at a quick bbq recipe tonight. Normally, you would think someone in this predicament would look up a recipe but that is just too predictable and logical for me so I winged it. I pulled the leftover roasted meat from the bones, removed the fat, and shredded it with a fork (for a more even consistency you may want to use a food chopper). I placed the meat in a large pot on the stove and added about 3/4 cup Hickory smoked bbq sauce, 3/4 cup white vinegar, and 3/4 cup water with 3 tbs of Lord Byron's Butt Rub seasonings thrown in for good measure. I slapped a roll of Pillsbury French Loaf dough in the oven and what we got was a really good BBQ sub. The meat was not over powered by the sauce at all (one of my chief complaints with Southern bbq). There was not an overpowering vinegar taste (my other complaint with Lexington style bbq) and it was not too sweet either. I think I may try this again in a crockpot to infuse the flavor more and possibly add a dash of Texas Pete to spice it up a tad as well but for winging something I have never tried, not bad at all. I'm going to take some to my Dad and let him try it as he has a great love for BBQ and see what he thinks. I will also try to remember to take a picture of it.....my husbands recent complaint is that he never gets to eat anything without having it's picture made first! LOL..sorry honey but atleast he's a good sport about some of my "experiments!"
Tuesday, April 1, 2008
Farm Fresh Orpington Eggs

My father is a unique person. He is full of life, zest and crazy schemes. If you tell him you want something, he will find it. He bargains, trades and scrounges just about everything. He has projects and plans and is a work-aholic. He is a slave driver in the hay fields, and spoilt brat at the dinner table. I love him dearly. One of his most recent adventures: chickens. My father has a long history with chickens. He had them as a child and at one point I believe showed them in competition..or maybe it was just country fairs...I can't remember now. We had them again when I was a child. I had two precious little Banny hens that actually liked to be handled and petted. I don't remember getting very many eggs, and the ones we did get were quite small, so they were just a pet adventure for me. Sadly, my parent's dogs thought they were quite tasty and we never got anymore chickens.....until now. The farm my parents recently purchased came complete with two very nice chicken coups. This was reason enough for Dad to want chickens again.....and did he get the chickens....quite a few of them including a very beautiful breed called Buff Orpington that lays medium brown eggs. He has a few other breeds as well but the Orpington's are everyone's favorites and are quite a pretty chicken to look at. I have grown fond of taking my food scraps to them and getting the eggs. They now have so many eggs that we don't know what to do with them all so they are selling them to neighbors. The point to all this is that this is one of the reasons you will see so many recipes for baking and quiches etc. I'm trying to figure out what to do with my 3 dozen eggs per week!!! One can only eat so many eggs and toast for breakfast!
Just to get you in the farm fresh frame of mind (say that three times fast), I tried to snap a few pictures for you...but they wouldn't pose for me, despite all the yummy scraps I gave them. I'm notorious for feeding them chicken.....chicken lasagna, deviled eggs, baked chicken skins......its kind of disturbing when I think on it too long. I just hope that one day they don't turn on each other because of the cannabilistic dishes I've been feeding them. OY!

History Lesson:
The original Orpington was developed in 1886 by William Cook (great last name for this huh?). Their ancestor breeds were: Minorcas, Langhsans and Plymouth Rocks (who said a chicken is just a chicken?). By 1905, he had created more colors (rather then just the original black) to include white, ,buff and blue. The breed is famous for its great egg-capacity but it was originally intended as a dual-purpose breed (meat and eggs). The popularity grew through the beautiful contours making this a popular breed to show (who knew right?).
Spinach and Ham Quiche

This recipe has become one of my favorites and recently the most requested. I invented this recipe based on other recipes. The other quiche recipe I've posted was good but this one is a meal all in one and is very simple to make. My parents ended up coming to my house for EAster dinner with only a few days warning so I scrounged around for a menu that didn't require any shopping. As this dish was already on our weekly menu I decided to make it for lunch. I served it with grilled salmon filets (chicken for Stephen), deviled eggs, and fried potatoes. For dessert I introduced my Sweet Potato/Pineapple Cake which I will post soon.
Spinach and Ham Quiche
Ingredients:
4-6 eggs (only 4 if they are large eggs) beaten
1 cup milk
1 cup shredded cheese (I used 1/2 cup monterey jack, 1/4 cup cheddar, 1/4 cup italian blend)
1 pkg. chopped spinach, thawed and drained (drain it and place it on a towel for 15-30 minutes to soak out extra moisture.
3 tbsp flour (I use self-rising)
1 tsp salt
1/4 stick butter
1 Pillsbury Roll out pie crust
1 center cut ham steak
1 cup chopped onion (or one small/medium onion chopped)
1 tsp pepper
1/4 tsp cayenne pepper
1 tsp parsley
Melt butter in pan and saute onion. Roll out your pie crust into a LARGE pie plate (or deep dish baker) and bake at 425 for 5 minutes. Trim fat from hamsteak, remove center bone and chop the rest of it into cubes. Add salt, pepper, cayenne, parsley to onion mixture. Meanwhile whick flour into milk and egg mixture then add the shredded cheese to it. Throw the spinach and ham into ONION pan and toss for a minute or so till heated through. Pour onion mixture into pie crust and pour the egg mixture over it, mixing it up a bit with a fork. Pop in the oven and bake for 15 minutes at 425 degrees then reduce heat to 300 for 30-35 minutes. Let Stand for 10 minutes before cutting and serving. I'm drooling just thinking about this!!

Tuesday, March 25, 2008
Traditional Carrot Salad
 Another comfort food growing up was my mom's carrot salad. This simple heavenly delight is good at any time of year, and so easy to make! We never waste apples or carrots (I'm sure the horses would not consider giving the old apples and carrots to them a waste, but I prefer to use them if they are not too far gone!) because we can always make this dish which never stays around the house long!
Use several large carrots (enough for about four cups of shredded carrot) peeled and shredded
One can of crushed pineapple (drained but reserve juice)
3 medium apples (more if you prefer), cored and diced into large chuncks
1/2 cup mayonaise
1 cup raisens
Soak raisens in reserved pineapple juice for about 5-10 minutes (do this first and then prepare carrots and apples)
Mix carrots, apples, crushed pineapple, raisens(drained from juice), and mayo together. Chill and serve! I've seen several versions of this over the years including adding nuts, coconut and other items but this simplistic country version holds my heart ...and TASTEBUDS!!
Homegrown Pasta Sauce
 Even though I have not been as consistent as I should be, I promise, I have been cooking, gardening and creating. We have not starved in any way, shape or form! (I could probably stand to starve for a few days and shed some pounds!) I have actually been cooking quite a bit and have made several quite healthy meals! One of our favorite things is home made pasta sauce. We had a profusion of tomatoes last year in our garden and I was able to freeze (I haven't gotten the hang of canning everything, so freezing is still my quickest option) several gallons of both tomatoes and sauce. Here is my garden tomato sauce:
Start with several large ripe tomatoes (depending on how much you want to make but I normally do about 10 or more at a time), preferably a mixture for better taste. My sauces consist of Red German Johnsans, Yellow Boy and a few Roma's. Blanch tomatoes (place for 30 seconds in boiling water and immediately place in cool water to remove skins). Put tomatoes in food processor (a blender will work as well) (for a thicker sauce or salsa drain tomatoes for a few minutes in collander and use a chopper). 
Finely chop one medium yellow onion, one green pepper (small) and one yellow or red pepper, set aside.
Use one small clove of garlic finely chopped (approx. 1 1/2 tbs) and place in sauce pan in approx. 1 tbs butter or light olive oil (two tbs chicken broth will work here as well) and saute on medium high. Add in your onion and continue to saute. Stir in your peppers. Add your herbs. I used dried herbs and go heavy on the oregeno, italian seasoning, salt and parsley, light on the pepper, thyme and basil. Add your tomatoes and simmer for a few hours (or transfer to crockpot for a few hours). For a heartier version add browned ground hamburger. Serve of a variety of pastas. Perfect for spaghetti and tortellini (thicken it up and add mushrooms for lasagna) and even great in a chunkier version as a salsa (add hot peppers and spice). This is also great to add in chuncks of squash, zuchini, eggplant etc for a veggie version! I love this dish because it is so versitile and in the summer I can literally go out in my garden and PICK everything to make it! ENJOY!

Shown here over cheese tortellini in the chunckier version:
Subscribe to:
Posts (Atom)